

Learning how to tie shoelaces seems so easy, but most of us stick with the one method we were taught and never look back. That’s a shame, because there’s a whole world of knots out there—some are faster, some are more secure, and some just look cooler.
Whether you’re a parent teaching your child, an athlete tired of your laces, or someone curious about a better way to tie your shoes, this guide is for you.
We’ll walk you through five different methods, from the classic “Bunny Ears” to the fast “Ian Knot.” By the end, you’ll have a new skill that will make your daily routine just a lot easier and better.
Choosing the Right Method
Not all knots are created equal. The best shoelace knot for you depends on your needs. Are you looking for speed, security, or a simple method to teach a child?
- For kids: The Bunny Ears method is often the easiest to learn.
- For speed: Ian Knot is the undisputedly best method.
- For security: The Double Bow is your best bet for activities where loose laces are a no-go.
Experiment with these five methods to discover your new favorite way for how to tie shoelaces.
1. The Bunny Ears Method
This is the go-to technique for teaching little kids how to tie shoelaces. It’s visual, easy to explain, and turns a chore into a fun story.
Best for: Children and beginners.
Step-by-Step Instructions
- Start with the Overhand Knot: Take one lace in each hand and cross them over to make an “X.” Tuck one lace under the other and pull tight. This is your base knot.
- Make Two Bunny Ears: Create a loop with each lace. These are your “bunny ears.” Make sure to hold the base of each loop so they don’t fall apart.
- Tie the Ears Together: Cross one bunny ear over the other.
- Tuck and Pull: Tuck one of the bunny ears through the hole that has formed underneath. Pull both loops tightly to secure the bow.
And there you have it! A simple way to learn the ropes.
2. The Standard Method (Loop, Swoop, and Pull)
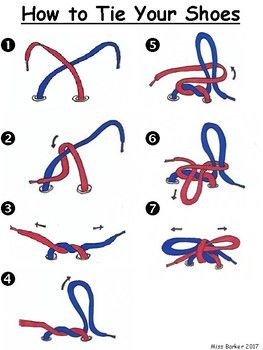
This is likely the method most adults use. It’s a bit quicker to tie shoes than the Bunny Ears method once you get the hang of it, and it forms the foundation for more advanced knots. If you’re looking for the classic way of how to tie shoelaces, this is it.
Best for: Everyday use.
Step-by-Step Instructions
- The Base Knot: Just like before, start with a simple overhand knot.
- Create One Loop: Make a single loop with one of the laces, pinching the base with your thumb and forefinger. This is sometimes called the “tree.”
- Swoop and Wrap: Take the other lace (the “rabbit”) and wrap it around the front of the loop.
- Push Through and Pull: Continue wrapping the loose lace around and push a bight (a small loop) of it through the hole you’ve created near the base. Pull both loops to tighten the bow.
This method is reliable for daily wear and serves as a great starting point for anyone looking to up their shoelace-tying game.
3. The Double Bow Shoelace Knot
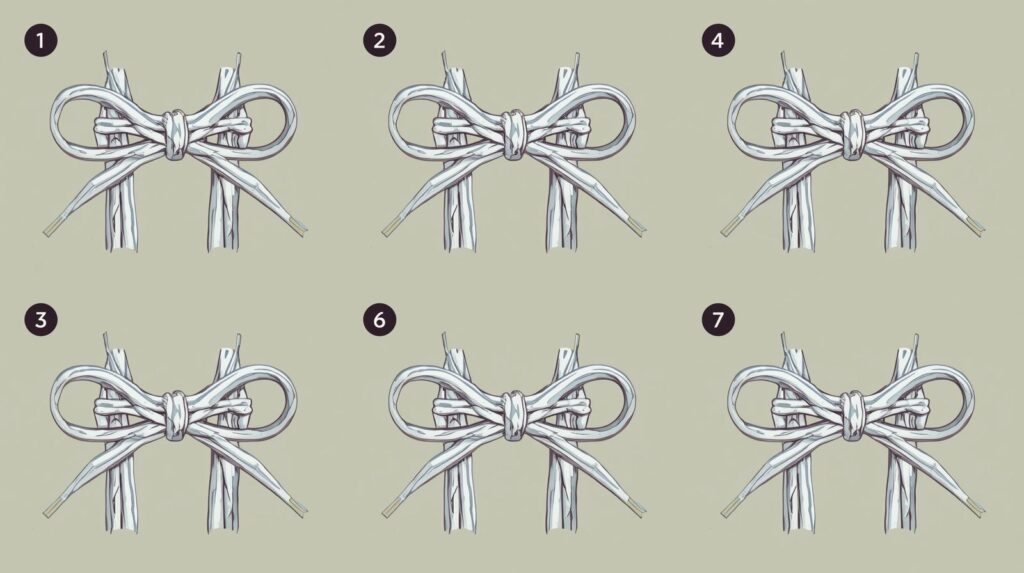
Tired of your laces coming undone during a run, or a hike? The Double Bow, also known as the “Secure Knot,” is your solution. It adds one extra step to the standard method that locks your bow in place.
Best for: Athletes, hikers, and anyone whose laces won’t stay tied.
Step-by-Step Instructions
- Tie a Standard Bow: Follow all the steps for the Standard Method, but don’t pull it completely tight just yet.
- The Extra Wrap: Take one of the loops and wrap it around the center knot one more time, passing it through the middle.
- Pull Everything Tight: Now, pull both loops firmly. This extra twist creates more friction in the knot, making it secure.
This simple adjustment is a game-changer for active individuals. Mastering this variation on how to tie shoelaces will give you peace of mind.
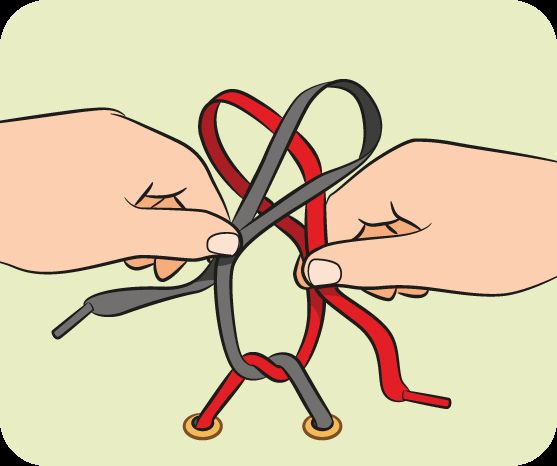
4. The Ian Knot

Meet the world’s fastest shoelace knot. Invented by Ian Fieggen, this method is pure genius. It looks complicated at first glance, but it’s really about creating two interlocking loops simultaneously. With a bit of practice, you can tie your shoes in a second.
Best for: Speed and efficiency.
Step-by-Step Instructions
- The Starting Knot: Begin with your usual overhand knot.
- Create Two Loops: This is the tricky part. With one hand, create a loop with the lace on that side, with the loose end hanging behind the loop. With your other hand, create another loop, but with the loose end in front.
- Push and Pull: Simultaneously, push one loop through the other while pulling the other loop through the first one. It’s a push-and-pull motion happening at the same time.
- Tighten: Pull the two new loops that emerge to secure the bow.
Don’t be discouraged if you don’t get this on the first try. Watch a video of Ian Knot in action, and you’ll soon be tying your shoes faster than anyone you know. It’s a fantastic skill for anyone wanting to learn a more efficient way of how to tie shoelaces.
5. The Circle Method (Surgeon’s Shoelace Knot)
Similar to the Double Bow, the Circle Method creates a more secure knot. It involves an extra wrap at the beginning, which helps lock the laces in place before you even form the bow.
Best for: Added security without a bulky knot.
Step-by-Step Instructions
- Double Overhand Knot: Start by making your “X.” Instead of tucking the lace under just once, wrap it around a second time. Then, pull tight. This double wrap is what gives the knot its strength.
- Form a Standard Bow: From here, simply tie your shoes using the Standard Method (Loop, Swoop, and Pull).
- Secure the Knot: Pull the loops tight. The double-wrapped base prevents the knot from slipping.
This is a great technique for anyone who likes the standard method but just needs a little extra hold.
Find Your Perfect Knot
Learning how to tie shoelaces is just the beginning. The real magic happens when you find the knot that perfectly suits your lifestyle.
So go ahead, grab a pair of shoes and give these methods a try. You might just discover a small, simple way to make your day a little bit better. Happy tying!
What is the easiest way to tie shoelaces?
For absolute beginners, especially children, the Bunny Ears Method is widely considered the easiest. Its storytelling approach (“make two bunny ears, cross them over…”) makes the steps memorable and intuitive. For adults who already know a basic knot, the Standard Method is typically the simplest for daily use.
What is the 2-1-3 method of lacing?
The 2-1-3 method is not a way to tie a knot but a technique for lacing shoes to relieve pressure on the top of the foot. It’s a “gap lacing” or “window lacing” technique where you skip a crossover at the pressure point, creating a gap. You lace normally, go straight up on both sides for one set of eyelets (the “window”), and then resume the crisscross pattern.
How to tie laces without showing the bow?
To get a clean, no-show look, you can try a few tricks. One popular way is to tie a very small, tight bow and then tuck it under the tongue of your shoe. Another method involves using a “bar lacing” pattern and tying the knot at the very top, tucking the ends into the sides of your shoe. This is a common question from people who want a minimalist look but still need to know how to tie shoelaces securely.